- 您现在的位置:买卖IC网 > Sheet目录218 > CUB5VR00 (Red Lion Controls)METER LCD DC VOLT 8DIGIT
��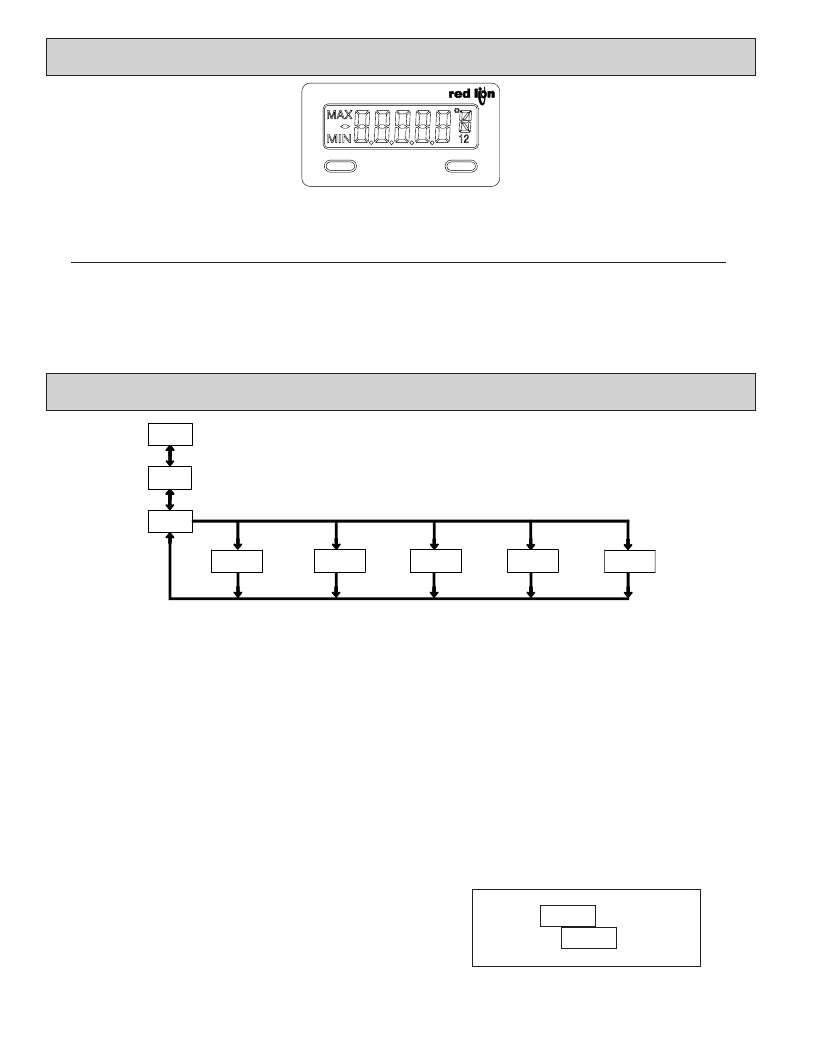 �
�
�5.0� R� EVIEWING�
�THE�
�F� RONT� B� UTTONS�
�AND�
�D� ISPLAY�
�SEL�
�RST�
�BUTTON�
�SEL�
�RST�
�DISPLAY� MODE� OPERATION�
�Index� display� through� enabled� values�
�Resets� values� (MIN/MAX)� or� outputs�
�ENTERING� PROGRAM� MODE�
�Press� and� hold� for� 2� seconds� to� activate�
�PROGRAMMING� MODE� OPERATION�
�Store� selected� parameter� and� index� to� next� parameter�
�Advances� through� the� program� menu�
�Increments� selected� parameter� value� or� selection�
�OPERATING� MODE� DISPLAY� DESIGNATORS�
�MAX� -� Maximum� display� capture� value�
�MIN� -� Minimum� display� capture� value�
�“1”� -� To� the� right� of� the� display� indicates� setpoint� 1� output� activated.�
�“2”� -� To� the� right� of� the� display� indicates� setpoint� 2� output� activated.�
�Pressing� the� SEL� button� toggles� the� meter� through� the� selected� displays.� If� display� scroll� is� enabled,� the� display� will� toggle� automatically� every� four� seconds� between�
�the� enabled� display� values.�
�6.0� P� ROGRAMMING�
�THE�
�M� ETER�
�DISPLAY�
�MODE�
�SEL�
�NO�
�OVERVIEW�
�PROGRAMMING� MENU�
�Pro�
�Signal� Input�
�Parameters�
�RST�
�SEL�
�1-INP�
�Secondary�
�Function�
�Parameters�
�SEL�
�2-SEC�
�Display� and� Front�
�Panel� Key�
�Parameters�
�SEL�
�3-dSP�
�Setpoint�
�Output�
�Parameters�
�SEL�
�4-SPt�
�Serial�
�Setup�
�Parameters�
�SEL�
�5-SEr�
�USrIN� ?�
�PROGRAMMINGMODEENTRY(SELBUTTON)�
�It� is� recommended� all� programming� changes� be� made� off� line,� or� before�
�installation.� The� meter� normally� operates� in� the� Display� Mode.� No� parameters�
�can� be� programmed� in� this� mode.� The� Programming� Mode� is� entered� by�
�pressing� and� holding� the� SEL� button.� If� it� is� not� accessible� then� it� is� locked� by�
�either� a� security� code,� or� a� hardware� lock.�
�MODULE� ENTRY� (SEL� &� RST� BUTTONS)�
�The� Programming� Menu� is� organized� into� separate� modules.� These� modules�
�group� together� parameters� that� are� related� in� function.� The� display� will� alternate�
�between� Pro� and� the� present� module.� The� RST� button� is� used� to� select� the� desired�
�module.� The� displayed� module� is� entered� by� pressing� the� SEL� button.�
�MODULE� MENU� (SEL� BUTTON)�
�Each� module� has� a� separate� module� menu� (which� is� shown� at� the� start� of� each�
�module� discussion).� The� SEL� button� is� pressed� to� advance� to� a� particular�
�parameter� to� be� changed,� without� changing� the� programming� of� preceding�
�parameters.� After� completing� a� module,� the� display� will� return� to� Pro� NO� .�
�Programming� may� continue� by� accessing� additional� modules.�
�SELECTION� /� VALUE� ENTRY�
�For� each� parameter,� the� display� alternates� between� the� present� parameter� and�
�the� selections/value� for� that� parameter.� The� RST� button� is� used� to� move� through�
�the� selections/values� for� that� parameter.� Pressing� the� SEL� button,� stores� and�
�activates� the� displayed� selection/value.� This� also� advances� the� meter� to� the� next�
�parameter.�
�For� numeric� values,� press� the� RST� button� to� access� the� value.� The� right� hand�
�most� digit� will� begin� to� flash.� Pressing� the� RST� button� again� increments� the�
�digit� by� one� or� the� user� can� hold� the� RST� button� and� the� digit� will� automatically�
�scroll.� The� SEL� button� will� advance� to� the� next� digit.� Pressing� and� holding� the�
�SEL� button� will� enter� the� value� and� move� to� the� next� parameter.�
�6�
�PROGRAMMING� MODE� EXIT� (SEL� BUTTON)�
�The� Programming� Mode� is� exited� by� pressing� the� SEL� button� with� Pro� NO�
�displayed.� This� will� commit� any� stored� parameter� changes� to� memory� and�
�return� the� meter� to� the� Display� Mode.� (If� power� loss� occurs� before� returning� to�
�the� Display� Mode,� verify� recent� parameter� changes.)�
�PROGRAMMING� TIPS�
�It� is� recommended� to� start� with� Module� 1� and� proceed� through� each� module� in�
�sequence.� When� programming� is� complete,� it� is� recommended� to� record� the�
�parameter� programming� and� lock� out� parameter� programming� with� the� user� input�
�or� programming� security� code.�
�FACTORY� SETTINGS�
�Factory� Settings� may� be� completely� restored� in� Module� 2.� This� is� useful�
�when� encountering� programming� problems.�
�ALTERNATING� SELECTION� DISPLAY�
�In� the� explanation� of� the� modules,� the� following� dual� display� with� arrows� will�
�appear.� This� is� used� to� illustrate� the� display� alternating� between� the� parameter�
�on� top� and� the� parameter� ’s� Factory� Setting� on� the� bottom.� In� most� cases,�
�selections� and� values� for� the� parameter� will� be� listed� on� the� right.�
�Indicates� Program� Mode� Alternating� Display�
�Parameter�
�?� N0� Selection/Value�
�Factory� Settings� are� shown.�
�发布紧急采购,3分钟左右您将得到回复。
相关PDF资料
CUR-3285-MB
BOX ABS 8.25X5.15X3.13" BLACK
CUR-3286-MB
BOX ABS 10.15X6.15X3.13" BLACK
CUR-793-MB
BOX ABS 4.1" X 2.23" X 2" W/BKTS
CUSTOM BGA
CUSTOM BGA SOCKETS
CW2500
EPOXY OVERCOAT 0.26OZ
CW7000
BA DISPENSING PENS 2 PER PACKAGE
CWI45-B-155.52M
CRY 155.25M 50PPM TH
CWR06NC105MR
CAP TANT 1UF 50V 20% 2010
相关代理商/技术参数
CUB70000
功能描述:COUNTER 8-DIGIT REFLECTIVE DISP RoHS:是 类别:工业控制,仪表 >> 计数器 系列:CUB7 其它有关文件:Declaration of Conformity 标准包装:1 系列:99766 计数速率:25Hz 数字/字母数:5 输入类型:机电式脉冲 输出类型:- 电源电压:24V 显示器类型:十进制拨轮
CUB70010
功能描述:COUNTER 8-DIGIT YEL/GRN BACKLIT RoHS:是 类别:工业控制,仪表 >> 计数器 系列:CUB7 其它有关文件:Declaration of Conformity 标准包装:1 系列:99766 计数速率:25Hz 数字/字母数:5 输入类型:机电式脉冲 输出类型:- 电源电压:24V 显示器类型:十进制拨轮
CUB70020
功能描述:COUNTER 8-DIGIT RED BACKLIGHT RoHS:是 类别:工业控制,仪表 >> 计数器 系列:CUB7 其它有关文件:Declaration of Conformity 标准包装:1 系列:99766 计数速率:25Hz 数字/字母数:5 输入类型:机电式脉冲 输出类型:- 电源电压:24V 显示器类型:十进制拨轮
CUB7CCG0
功能描述:COUNTER 8-DIGIT LV GREEN RoHS:是 类别:工业控制,仪表 >> 计数器 系列:CUB7 其它有关文件:Declaration of Conformity 标准包装:1 系列:99766 计数速率:25Hz 数字/字母数:5 输入类型:机电式脉冲 输出类型:- 电源电压:24V 显示器类型:十进制拨轮
CUB7CCR0
功能描述:COUNTER 8-DIGIT LV RED BACKLIGHT RoHS:是 类别:工业控制,仪表 >> 计数器 系列:CUB7 其它有关文件:Declaration of Conformity 标准包装:1 系列:99766 计数速率:25Hz 数字/字母数:5 输入类型:机电式脉冲 输出类型:- 电源电压:24V 显示器类型:十进制拨轮
CUB7CCS0
功能描述:COUNTER 8-DIGIT LV REFLECTIVE RoHS:是 类别:工业控制,仪表 >> 计数器 系列:CUB7 其它有关文件:Declaration of Conformity 标准包装:1 系列:99766 计数速率:25Hz 数字/字母数:5 输入类型:机电式脉冲 输出类型:- 电源电压:24V 显示器类型:十进制拨轮
CUB7CVG0
功能描述:COUNTER 8-DIGIT HV GREEN RoHS:是 类别:工业控制,仪表 >> 计数器 系列:CUB7 其它有关文件:Declaration of Conformity 标准包装:1 系列:99766 计数速率:25Hz 数字/字母数:5 输入类型:机电式脉冲 输出类型:- 电源电压:24V 显示器类型:十进制拨轮
CUB7CVR0
功能描述:COUNTER 8-DIGIT HV RED RoHS:是 类别:工业控制,仪表 >> 计数器 系列:CUB7 其它有关文件:Declaration of Conformity 标准包装:1 系列:99766 计数速率:25Hz 数字/字母数:5 输入类型:机电式脉冲 输出类型:- 电源电压:24V 显示器类型:十进制拨轮